PSP 8 Full Tutorial: Gale Harold
Jun. 24th, 2005 05:57 amI don't know if anyone will have any interest in this tutorial but I rather liked the icon and since I actually saved the layers I thought I'd put it up. :D
Learn how to turn into
into 
I work in PSP 8 and probably still do things a little backwards from some people, but if it gets the job done, right? Also, please don't make this exact same icon, step-for-step, although I don't know why you'd want to anyway. Be original!
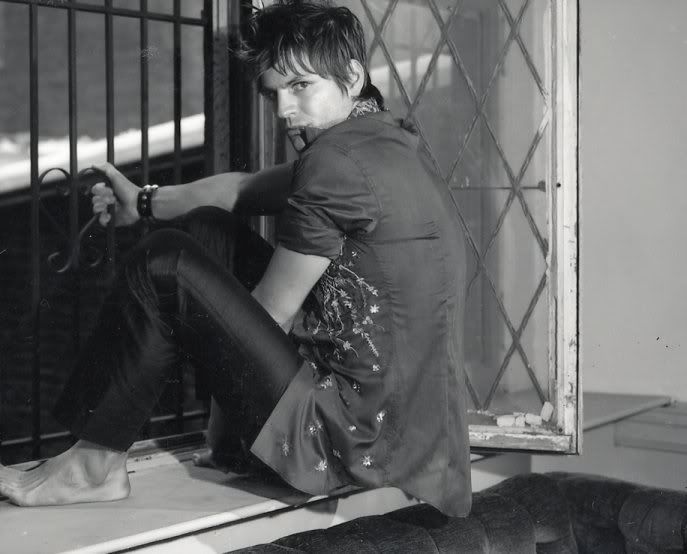
Okay, so, start out with the original image and crop it however you want. This is my base:

01. I duplicated it (1), sharpened, then duplicated again (2). I set duplicate 1 to screen and duplicate 2 to soft light. Then I desaturated the soft light layer, cause even though it's a black and white image I thought it did something to it. I'm also a creature of habit. Whatever. I probably just smoke too much crack. Those steps gave me this:

02. I used this gradient set to burn at 26%: to this:
03. Then this gradient set to soft light at 100%: for this:
04. Then I duplicated Gale base layer, dragged it to the top, sharpened it and set it to soft light. Not much different but a little more defined (at least in my mind):

05. Next I used this gradient/texture that I'm about 97.45% sure is by![[livejournal.com profile]](https://www.dreamwidth.org/img/external/lj-userinfo.gif) detoxcocktails set to 100% overlay:
detoxcocktails set to 100% overlay:

06. So that brought me to the next image that I used my selection tool on to make a thin, vertical line on a new layer and flood filled it with white:

07. I went back to the image from step 04 and used the selection tool again to copy a bit of Gale's face. Then I pasted it as a new layer and positioned it over the white line:

08. It looked pretty lame just sitting there so I used my selection tool again (new layer) and made a box around Gale's face, flood-filled with white again. I positioned it under the layer with the portion of Gale's face and lowered the opacity to 50%:

09. Then I added some simple text cause I suck like syphilitic donkey balls when it comes to icon text and taa daa!
Gale:
I created this foractors100 so it's not up for grabs yet but I hope to stop procrastinating (*loves amazingly on new banner*) and get my first batch posted for that challenge in the next few days. *crosses fingers*
If you use this tutorial in any way to help make something I'd love to see it!
Learn how to turn
 into
into I work in PSP 8 and probably still do things a little backwards from some people, but if it gets the job done, right? Also, please don't make this exact same icon, step-for-step, although I don't know why you'd want to anyway. Be original!
Okay, so, start out with the original image and crop it however you want. This is my base:
01. I duplicated it (1), sharpened, then duplicated again (2). I set duplicate 1 to screen and duplicate 2 to soft light. Then I desaturated the soft light layer, cause even though it's a black and white image I thought it did something to it. I'm also a creature of habit. Whatever. I probably just smoke too much crack. Those steps gave me this:
02. I used this gradient set to burn at 26%:
to this: 03. Then this gradient set to soft light at 100%:
for this: 04. Then I duplicated Gale base layer, dragged it to the top, sharpened it and set it to soft light. Not much different but a little more defined (at least in my mind):
05. Next I used this gradient/texture that I'm about 97.45% sure is by
06. So that brought me to the next image that I used my selection tool on to make a thin, vertical line on a new layer and flood filled it with white:
07. I went back to the image from step 04 and used the selection tool again to copy a bit of Gale's face. Then I pasted it as a new layer and positioned it over the white line:
08. It looked pretty lame just sitting there so I used my selection tool again (new layer) and made a box around Gale's face, flood-filled with white again. I positioned it under the layer with the portion of Gale's face and lowered the opacity to 50%:
09. Then I added some simple text cause I suck like syphilitic donkey balls when it comes to icon text and taa daa!
Gale:
I created this for
If you use this tutorial in any way to help make something I'd love to see it!